How to Set Up a Gecko Hatchling Grow-Out System
Published on: February 27, 2026 | Last Updated: February 27, 2026
Written By: Alexander 'Gecko Geek' Johnson
Watching a gecko hatchling grow is amazing, but managing a dozen tiny, fragile lizards can quickly become a stressful, time-consuming chore. You worry about them getting enough food, staying safe from each other, and thriving in their first critical months.
I’ve raised many clutches over the years, and a proper grow-out system was the single biggest game-changer for my sanity and my geckos’ health. I will help you build a setup that is efficient for you and safe for them by covering these key takeaways:
- The specific enclosure type that saves space and simplifies maintenance.
- How to create a secure, stress-free environment that prevents competition.
- A straightforward feeding and monitoring routine that promotes rapid, healthy growth.
You will get clear, step-by-step advice you can implement right away. The article covers: Enclosure Choice, Heating & Humidity, Safe Substrates, Feeding Stations, Health Monitoring, and Transitioning to Adult Tanks.
Essential Grow-Out Enclosure Setup
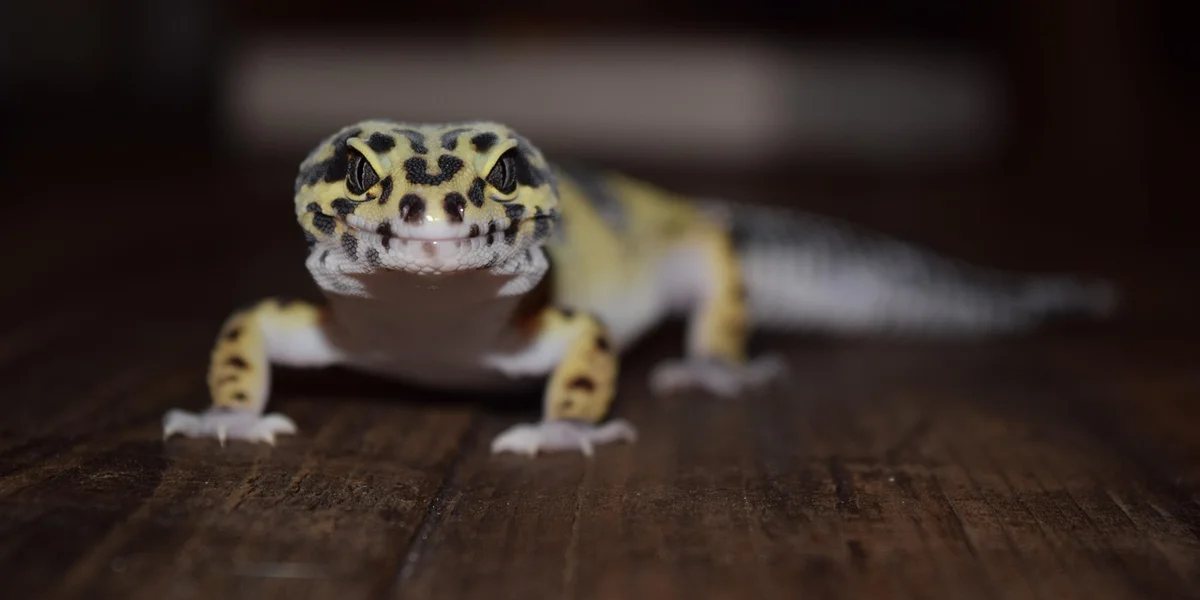
Setting up a hatchling’s first home is your most important job. You are building the foundation for their entire life, and getting it right from day one prevents a world of health issues down the road. I’ve raised everything from feisty Leopard Geckos like Griffey to nimble Cresteds like Jeter, and the core principles remain the same. For leopard gecko hatchlings, the ideal habitat centers on a stable heat gradient, secure hides, and a safe, easy-to-clean substrate. Getting these basics right from day one sets them up for healthy growth and minimal stress.
Your must-have shopping list is refreshingly simple:
- An appropriately sized enclosure
- Safe, simple substrate
- At least three distinct hiding spots
- A shallow water dish
- A secure lid (for climbers)
Choosing the Right Enclosure Size and Type
A common mistake is using a massive tank for a tiny hatchling. Too much space can be overwhelming and make it hard for them to find food, water, and heat. For a single baby leopard or fat-tailed gecko, a 10-gallon tank or a 6-quart plastic tub is perfect. For crested or gargoyle geckos, a tall 12x12x18 glass terrarium works well. Getting housing requirements right means matching tank size and setup to the gecko species. A well-planned enclosure supports feeding, heating, and overall health.
Let’s compare your main options:
- Plastic Tubs: Inexpensive, great at holding heat and humidity, and feel secure. I’ve used them for years with fantastic results.
- Glass Terrariums: More attractive for display and offer excellent ventilation, but can be pricier and may require modifications to maintain humidity for some species.
If you’re housing multiple hatchlings together, which I only do with same-sized babies from the same clutch, you must increase the space and, most critically, provide multiple feeding stations to prevent bullying.
Selecting a Safe Substrate
This is where many new owners get into trouble. Hatchlings are curious and will inevitably taste their flooring, so you must choose a zero-risk option. Loose substrates like sand, mulch, or coconut fiber are a hard no for terrestrial babies.
The risk of fatal impaction is just too high. I learned this the hard way with my first gecko years ago.
Your safest bets are:
- Paper Towel: My top recommendation. It’s cheap, sterile, and lets you easily monitor their health and droppings.
- Non-Adhesive Shelf Liner: Easy to wipe clean and provides solid footing.
- Tile Slates: A more permanent option that holds heat beautifully.
Stick with paper towel for at least the first six months; it’s the best training wheels you can have.
Creating Secure Hiding Spots
Hides are not decorations; they are essentials for your gecko’s mental well-being. A stressed gecko is a gecko that won’t eat, and hatchlings stress easily. You need a minimum of three hides to create a proper temperature gradient.
- A warm hide placed over the heat source.
- A cool hide on the opposite end of the enclosure.
- A humid hide filled with damp sphagnum moss in the middle to aid perfect sheds.
You don’t need to spend a fortune-a clean, smooth-sided plastic food container with a hole cut in the side works perfectly as a humid hide. Just file the edges smooth. To create a DIY humid hide for your gecko, line the tub with damp moss or coconut fiber and add a small vent to regulate humidity. My gecko A-Rod loves rearranging his commercial cork bark hides, but the DIY plastic tub was his first and favorite.
Perfecting Temperature and Humidity
Getting the climate right is what separates okay care from great care. Reptiles cannot regulate their own body temperature internally, so your setup does all the work for them. A proper heat gradient lets them move between warm and cool areas as needed, which is vital for digestion and overall health.
Setting Up Your Heating System
An under-tank heater controlled by a thermostat is the gold standard for terrestrial species. An unregulated heat mat is a severe burn risk and can literally cook your gecko from below. I never, ever skip a thermostat, especially when selecting one for my gecko’s enclosure.
Here is my step-by-step process:
- Stick the heat mat to the bottom of the tank on the outside, covering no more than one-third of the floor.
- Place the thermostat probe inside the tank, directly on the glass over the center of the mat.
- Set the thermostat to your target temperature. For a leopard gecko’s warm side, this is 88-92°F.
- Always check the surface temperature with a digital infrared thermometer. The thermostat dial is a guide, not a guarantee.
This system creates a warm floor for belly heat, which is how they naturally digest food.
Managing Humidity Control
Humidity needs vary by species, but the tool for measuring it is universal: a digital hygrometer. Those cheap analog dials are notoriously inaccurate; a digital one is a small investment for peace of mind.
For leopard geckos, you want an ambient humidity around 30-40%. For crested geckos, aim for 50-70%. The simplest way to manage this is with your humid hide.
By keeping the high humidity contained to one hide, you avoid turning the entire enclosure into a moldy, respiratory-infection risk. Simply check the moss every day or two and re-mist it with warm water to keep it damp, not soggy. Proper ventilation in the main enclosure will prevent stagnant, moist air from building up.
Hatchling Feeding and Nutrition Schedule
Getting your hatchling’s diet right from day one sets them up for a healthy, vibrant life. I feed my geckos like Griffey and Mookie on a strict daily schedule to ensure they grow strong and avoid common health pitfalls. Hatchlings have fast metabolisms and need frequent, nutrient-packed meals to support their rapid development.
Offer food every single day, ideally in the evening when they are most active. In practice, the best time of day to feed your leopard gecko is late afternoon to early evening, matching their peak activity. This timing supports natural hunting behavior and digestion. Aim for 3-5 appropriately sized, gut-loaded insects per feeding session, adjusting based on how much your gecko eagerly eats in 10-15 minutes. Never leave uneaten live prey in the enclosure overnight, as it can stress or even nibble on your gecko.
Choosing Appropriate Prey and Insect Size
Selecting the right feeder insects is like choosing the perfect building blocks for growth. The best starter insects for most hatchlings are pinhead crickets, small dubia roach nymphs, and freshly shed (white) mealworms due to their soft exoskeletons and high digestibility.
I always use the “space between the eyes” rule with my crew. No insect should be wider than the space between your gecko’s eyes; this prevents choking and impaction, a lesson I learned quickly with my curious leopard gecko, Griffey. If the prey looks too big, it is-opt for a smaller size.
- Pinhead Crickets: Excellent for stimulating hunting behavior.
- Small Dubia Roaches: Packed with protein and easy to digest.
- Black Soldier Fly Larvae (Nutrigrubs): A great calcium-rich option.
Supplementation: Calcium and Multivitamin Dusting
Dusting isn’t just an extra step; it’s a non-negotiable part of preventing Metabolic Bone Disease (MBD). Plain calcium powder (without D3) should be available in a small dish inside the enclosure at all times, allowing your gecko to self-regulate as needed.
Calcium with D3 is used for dusting insects because D3 helps their bodies absorb the calcium. I use a simple, rotating schedule: dust feeders with calcium + D3 three times a week, and with a high-quality reptile multivitamin once a week. After my giant day gecko, Babe, showed early signs of MBD, I became a supplement fanatic-it made a world of difference.
Daily Monitoring and Growth Tracking
A quick, consistent daily check is your best tool for catching issues early. I spend five minutes each morning observing my geckos, looking for bright eyes, alertness, and a plump tail, which is their main fat storage.
Keep a simple log to track their progress. Weigh your hatchling weekly using a small digital gram scale; steady weight gain is a key indicator of good health. A sudden drop can signal illness or stress.
- Appetite: Is your gecko hunting eagerly? A lack of interest in food can be a red flag.
- Body Condition: The tail should be thick, not bony. The belly shouldn’t look sunken.
- Droppings: Healthy droppings have a solid, dark part (feces) and a white part (urates). Runny or discolored droppings need attention.
Establishing a Cleaning Routine
A clean home is a healthy home, especially in the confined space of a grow-out enclosure. I spot-clean my geckos’ tubs every single day, removing any uneaten food, shed skin, and waste to prevent bacteria and odor buildup.
For a deep clean, I follow a monthly routine. Completely empty the enclosure, scrub all surfaces with a reptile-safe disinfectant, rinse thoroughly, and add fresh substrate. My African fat-tailed gecko, A-Rod, is a neat freak who seems much calmer after a full reset of his territory.
Troubleshooting Common Hatchling Problems
Raising hatchlings is incredibly rewarding, but it’s not without its heart-stopping moments. When a tiny gecko seems off, quick and correct action makes all the difference. I’ve had my share of panicked nights, and I’m here to help you navigate the most common issues.
Dealing with Refusal to Eat
Nothing is more stressful than a hatchling that won’t eat. My crested gecko, Jeter, gave me a real scare when he first arrived. The first step is always to stay calm and systematically check your setup. A hunger strike is usually a symptom, not the disease itself.
- Check Your Temperatures: The warm side of the enclosure must be between 88-92°F. If it’s too cold, their metabolism slows and they can’t digest food.
- Review Your Setup: Is the enclosure too open? Hatchlings feel safest with plenty of clutter and hiding spots. Stress is a major appetite killer.
- Try a Different Feeder: Some hatchlings are just picky. If they’re ignoring small crickets, try flightless fruit flies or tiny dubia roach nymphs. The movement can trigger their feeding response.
- Assess Feeder Size: The prey item should be no larger than the space between the hatchling’s eyes. An item that’s too big is intimidating.
- Consider Hand-Feeding: For a particularly shy or struggling hatchling, using soft-tipped tweezers to offer a worm can sometimes kickstart their instincts.
Scaling Your System for Multiple Hatchlings
Once you have the rhythm down for one hatchling, you might consider raising a small group. Co-housing can save space initially, but it requires vigilant observation and a clear exit strategy. I learned this the hard way with my first clutch.
- The Pros: It’s more space-efficient and can make feeding and cleaning slightly easier when they are very small.
- The Cons: Competition for food, the spread of illness, and aggression are real risks. You cannot monitor individual poop or eating habits as easily.
- When to Separate: The moment you see any size disparity, bullying, or food aggression, it’s time for individual housing. Do not wait for a visible injury to occur. A good rule of thumb is to separate them before they are three months old or show any signs of sexual maturity.
Biosecurity and Quarantine Protocols
This is the single most important practice for any responsible keeper. Quarantining new arrivals isn’t just a suggestion; it’s a non-negotiable duty to your existing animals. I have a dedicated quarantine tub after a scare with a new gecko years ago.
Your quarantine setup should be simple and easy to disinfect.
- Location: Keep the new gecko in a separate room, ideally with no shared air vents with your main collection.
- Equipment: Use entirely separate feeding tongs, spray bottles, and cleaning supplies. Paper towel substrate is best for monitoring health and easy changes.
- Observation Period: A strict 60-90 day quarantine is standard. During this time, monitor their weight, appetite, and feces closely. Always handle your established geckos first before touching the new one.
This process might seem tedious, but it protects all your animals from hidden parasites or infections. My gargoyle gecko, Mookie, went through a full 90-day quarantine, and it gave me total peace of mind when he finally joined the crew. A complete gecko quarantine protocol should be paired with a day-by-day safety checklist to keep track of every step. Keeping a simple daily log helps catch issues early and ensures you’re following the protocol every day.
Common Questions
When should I move my hatchling to its permanent adult enclosure?
You should transition your gecko to its adult home once it has reached a stable, sub-adult size, typically around six months to a year old depending on the species and growth rate. Growth rate and final size vary by species, so monitor your gecko’s growth to gauge when it reaches its expected adult size and age for transitioning.
How often is it safe to handle my gecko hatchling?
You should limit handling to essential health checks for the first few weeks to minimize stress, only beginning brief, gentle sessions after the hatchling is eating regularly and appears settled.
What are the specific risks of keeping multiple hatchlings together long-term?
Long-term co-housing significantly increases the risks of injury from aggression, stress-induced food refusal, and the rapid spread of illness or parasites among the group.
Final Words
Setting up a proper grow-out system boils down to a simple, secure, and sterile environment. Focus on a basic setup with paper towel substrate, a handful of snug hides, and precise temperature control to give your hatchlings the best start. Consistent feeding with properly-sized, gut-loaded insects and regular, gentle monitoring of their growth and behavior are your keys to success.
Remember, every gecko you raise is a long-term commitment to its wellbeing. I’ve learned that the most rewarding part of breeding isn’t the number of eggs, but watching each healthy hatchling grow into a thriving adult. Realize the Gecko lifecycle milestones—from egg to hatchling, from juvenile to adult—guide care at every stage. Tracking these milestones helps you tailor feeding, housing, and enrichment to their evolving needs. Stay curious, keep learning from reputable sources, and always prioritize the welfare of these amazing little creatures in your care.
Further Reading & Sources
- NEHERP – Mourning Gecko Care
- NEHERP – Crested & Gargoyle Gecko Care
- Crested Gecko Care Guide – Celestial Exotics
The Gecko Guide is your ultimate resource for gecko enthusiasts, providing expert advice and practical tips to ensure the health and happiness of your scaly companions. Alexander is a passionate gecko owner with over a decade of experience in reptile care. We are dedicated to offering accurate, up-to-date information to support your gecko journey.Our mission is to foster a community of responsible gecko owners who are passionate about the well-being of these fascinating creatures.
Hatchling & Juvenile Care