Step-by-Step Guide: How to Safely Assist a Gecko with Stuck Shed
Published on: January 12, 2026 | Last Updated: January 12, 2026
Written By: Alexander 'Gecko Geek' Johnson
Your gecko’s stuck shed can make you feel panicked and unsure how to help. I’ve felt that same worry watching my own geckos, like when Jeter had a stubborn patch on his tail.
I’ll guide you through this with clear steps and my personal experience. Here are the key points you’ll learn:
- Why stuck shed happens and how to spot it early.
- Safe, gentle techniques to remove the shed without stress.
- Easy ways to prevent future shedding problems.
You’ll get straightforward advice that works. The guide covers: identifying stuck shed, step-by-step removal, aftercare, and prevention.
Why Stuck Shed Happens and How to Prevent It
Stuck shed, or dysecdysis, isn’t just a random event. It’s a clear signal from your gecko that something in their environment or health is off. In my years of keeping everything from Leopard Geckos to my Giant Day Gecko, Babe, I’ve learned that prevention is always simpler than the cure. For quick action, check out the ultimate stuck shed checklist: 10 steps to immediately resolve dysecdysis. These steps cover humidity, substrate, enclosure, and supportive care to help your gecko shed cleanly and prevent recurrence.
The Main Causes of Stuck Shed
There are a few usual suspects when it comes to incomplete sheds.
- Low Humidity: This is the number one culprit. Without enough moisture in the air, the old skin can’t properly separate from the new skin underneath.
- Poor Nutrition: A diet lacking in key vitamins and minerals, especially vitamin A, can lead to poor skin quality and difficult sheds.
- Inadequate Habitat Features: Your gecko needs rough surfaces, like rocks and branches, to rub against and help pull the shed off. A smooth, barren tank is a shedding nightmare.
- Underlying Health Issues: Dehydration, mites, or other illnesses can weaken your pet and complicate the shedding process.
Your Proactive Prevention Plan
You can dramatically reduce the risk of stuck shed with a consistent routine.
- Master the Humidity Hide: Provide a humid hide filled with damp sphagnum moss or paper towels on the warm side of the enclosure. My geckos, like Griffey, use theirs daily when in shed.
- Provide a Varied Diet: Gut-load your feeder insects with nutritious greens and use a high-quality vitamin supplement that contains vitamin A.
- Ensure Proper Hydration: Always have a shallow water dish available. I also lightly mist the tank walls in the evening for my Crested and Gargoyle geckos to drink from.
- Furnish for Function: Add cork bark, slate, and other textured décor. My Fat-Tailed gecko, A-Rod, uses his slate piece as a dedicated scratching post.
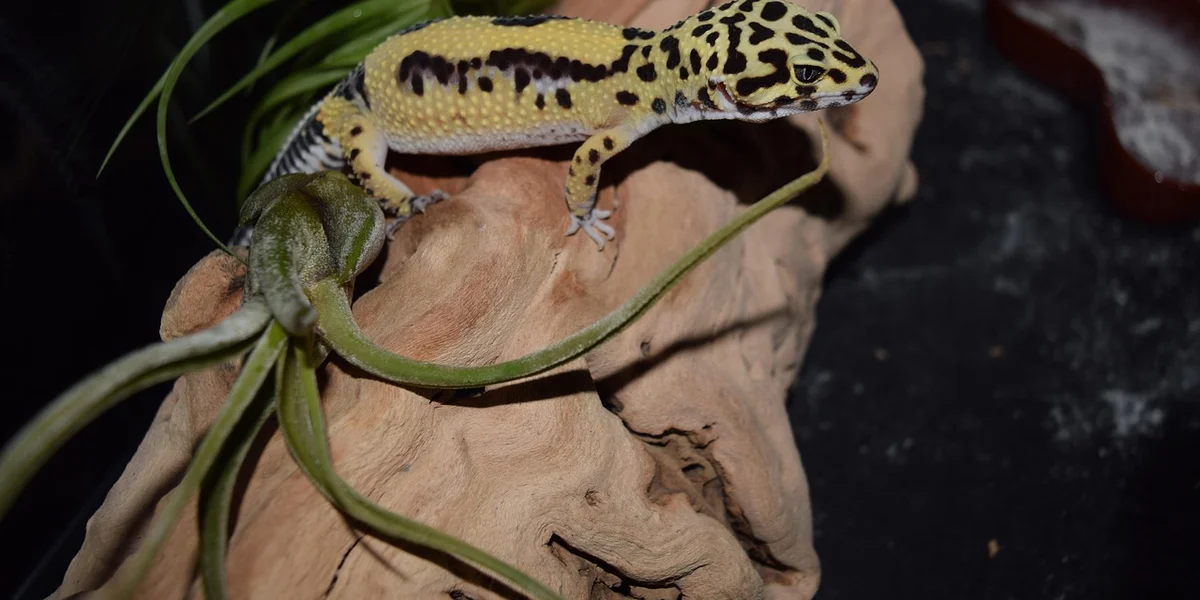
Recognizing the Signs of Stuck Shed on Your Gecko
Catching a stuck shed early is critical for preventing serious complications like loss of toes or tail tips. You must become a keen observer, especially when you know your gecko is in its shedding cycle, which is called “in the blue” due to their cloudy, dull appearance. Some keepers turn to best-practice products and tools for shedding assistance, such as humidity aids and gentle, reptile-safe aids. Always choose options labeled safe for geckos and follow directions to avoid damage.
Visual Clues to Look For
- Patches of Dry, Wrinkled Skin: Look for pieces that look like crumpled tissue paper stuck to the body, tail, or head.
- Skin Tightening Around Toes and Tail Tip: This is a major red flag. The old shed can act like a tiny rubber band, cutting off circulation.
- Remaining Shed on the Head or Eyes: Skin stuck over the eyes can impair vision and cause stress. This is common in leopard geckos.
- Dull, Discolored Patches: Areas that should be bright and vibrant, like on my Giant Day Gecko, will look faded if old skin is covering them.
Behavioral Signs Your Gecko is Struggling
Your gecko will often tell you they have a problem through their actions.
- Excessive Rubbing: They may frantically rub their face or body against tank decorations in an attempt to loosen the skin.
- Lethargy or Hiding More Than Usual: A gecko that feels unwell or stressed by the stuck shed will often retreat.
- Lack of Appetite: My playful Gargoyle gecko, Mookie, will even skip a meal if he’s bothered by a piece of stuck shed.
- Favoring a Limb: If shed is constricting a foot or toe, you might see them limping or not putting weight on it.
Gathering Your Safe Shed-Removal Toolkit

Before you start, get everything you need within arm’s reach. This prevents frantic searches with a wet, wiggly gecko in your hands. You don’t need fancy equipment, just a few simple, safe items.
- A shallow plastic container or tub with a secure, ventilated lid
- Paper towels or a clean, soft cloth
- Lukewarm water (details on temperature are crucial, coming up!)
- Cotton swabs (Q-tips)
- A hide or small object from your gecko’s enclosure to make them feel secure
I keep a dedicated “spa tub” for my crestie, Jeter. Having a designated kit means you’re always prepared for a sudden stuck shed emergency.
Step-by-Step Guide to Gently Assist with Stuck Shed
Patience is your most important tool here. Rushing this process can cause serious harm. Move slowly and let your gecko’s comfort level guide your pace. During your first 24 hours, follow our essential step-by-step guide for new geckos. Getting the basics right—tank setup, safe handling, and humidity—paves the way for a healthy start.
Preparing a Comfortable Soaking Area
Your goal is to create a safe, stress-free mini spa. I always do this on a stable surface, like a countertop with a towel down.
- Line the bottom of your container with paper towels or a soft cloth. This gives your gecko secure footing.
- Add lukewarm water. It should feel warm to your wrist, not hot. The ideal temperature is between 85-90°F (29-32°C)-anything hotter can burn their delicate skin.
- The water level should be very shallow, only high enough to cover your gecko’s feet and belly. It should never come up to their nostrils.
- Place their familiar hide or object in the container to help them feel less exposed.
Soaking and Softening the Stuck Shed
This is the most critical step for making the shed pliable and easy to remove.
- Gently place your gecko in the prepared container and secure the lid. They might try to climb out at first.
- Let them soak for 10-15 minutes. Supervise them the entire time. The steam and moisture will work to gently hydrate and loosen the tight, stuck skin.
- You can lightly mist the air inside the container once or twice during the soak to increase humidity.
- After soaking, your gecko will likely be damp and the stuck shed should look wrinkled and softer.
Careful Removal Techniques for Sensitive Spots
Never, ever pull on stuck shed. If it doesn’t come off with minimal effort, it needs more soaking.
- For the Body: Use your dampened finger to gently rub in the direction of the scales. The skin should roll off easily.
- For Toes and Tail Tip: This is where serious injury can happen. Take a damp cotton swab and softly roll it over the stuck shed. Constricted toes can lose blood flow and fall off, so be extra meticulous here.
- For Eyes (Especially for Leopard Geckos): Never pick at eye caps. Let the moist cotton swab do the work by holding it gently against the area to let the moisture seep in.
If a piece isn’t budging, stop. It’s far better to do another short soak tomorrow than to force skin off and cause a raw wound. My gecko Griffey once had a stubborn piece on his toe, and a second, shorter soak the next day did the trick perfectly.
When to Seek Professional Veterinary Care
While many stuck shed situations are manageable at home, some are genuine emergencies. I learned this the hard way when my gecko, A-Rod, developed a stubborn toe shed that started to look discolored. Knowing when to call a vet can save your gecko’s toe, tail, or even its life.
You need to seek immediate veterinary assistance if you observe any of the following:
- Visible Injury or Bleeding: If the skin has torn or there is any sign of blood around the constricted area.
- Discoloration: If the affected toe, tail tip, or limb turns a dark blue, black, or deep red color. This indicates a severe lack of blood flow.
- A Foul Odor: A bad smell from the stuck shed is a major red flag for infection.
- Swelling or Pus: Any noticeable swelling or discharge means an infection has already set in and needs medical treatment.
- Repeated Failure: If you’ve tried safe soaking and gentle assistance multiple times over two days with no progress.
- Eye Caps Involved: Stuck shed on the eyes is extremely delicate. Never try to remove it yourself.
Do not attempt to pull, cut, or forcefully peel the shed if you see these warning signs. You could cause serious harm. A reptile vet has the proper tools and expertise to handle these delicate situations safely.
Preventing Future Stuck Shed with Better Enclosure Care
The absolute best way to deal with stuck shed is to stop it from happening in the first place. After my experience with A-Rod, I became obsessive about perfecting my enclosure setups, and I haven’t had a serious stuck shed issue since. Prevention boils down to three key areas: humidity, hydration, and habitat.
Mastering Humidity Levels
Incorrect humidity is the number one cause of shedding problems. Each species has a specific “sweet spot” for humidity, especially right before a shed.
- Use a Digital Hygrometer: Those cheap analog gauges are often inaccurate. A digital one gives you a reliable reading.
- Know Your Species’ Needs: My Crested Gecko, Jeter, needs 50-70% humidity, while my Leopard Gecko, Griffey, does best around 40-50%, spiking to 60-70% when in shed.
- Create a Humid Hide: This is non-negotiable. Take a small container, cut a door, and fill it with damp (not wet) sphagnum moss or paper towels. This gives your gecko a perfect, steamy little room to loosen its skin on its own terms. My geckos use theirs constantly when they look cloudy.
Ensuring Proper Hydration
Hydration starts from the inside out.
- Provide a Shallow Water Bowl: Use fresh water daily. Some geckos, like my Gargoyle Mookie, will drink from it directly.
- Mist the Enclosure: Lightly mist the walls and plants in the evening. Many geckos, like Cresteds, will lick water droplets off surfaces.
- Consider a Dripper System: For species that prefer moving water, a slow dripper can encourage drinking.
Optimizing the Habitat and Nutrition
A healthy gecko in a well-set-up home sheds perfectly.
- Offer Rough Surfaces: Include cork bark, slate tiles, or rough rocks. Your gecko will rub against these surfaces to help kickstart and complete the shedding process.
- Gut-Load and Dust Feeder Insects: A poor diet leads to poor sheds. Feed your crickets and roaches nutritious veggies and always dust them with a high-quality calcium and vitamin supplement. Proper nutrition makes the skin more elastic and easier to shed.
- Check for Stuck Shed Post-Shed: Make a habit of doing a quick “toe and tail tip” check a day after you see the shed skin in the enclosure.
Post-Removal Monitoring and Gecko Health Checks
Getting the stuck shed off is a huge relief, but your job isn’t over yet. Think of this as the recovery phase, where your careful observation is the most critical medicine. Keeping the enclosure calm can help a stressed gecko settle, and those small adjustments are often the most effective techniques. Simple environmental fixes—steady humidity, safe hiding spots, and consistent temperature—make recovery smoother. I always spend the next hour just watching my geckos, like Griffey, to ensure they are truly back to their normal, curious selves.
Immediate Post-Procedure Assessment
Right after the process, your gecko might be a little stressed, and that’s perfectly normal. Your first task is to make sure the underlying skin is healthy.
- Check for Raw or Red Skin: Gently examine the area where the shed was stuck. A little pinkness is okay, but bright red, raw, or bleeding skin is a sign of injury and needs attention.
- Look for Retained Shed: Double-check those tricky areas-toes, tail tip, around the eyes and vent. Sometimes a tiny ring of shed can remain and cause problems later.
- Observe Their Behavior: A healthy gecko will start moving normally within a short time. If they remain lethargic, refuse to move a limb, or seem to be in pain, this is a red flag.
Habitat and Husbandry Review
A stuck shed is almost always a husbandry issue. This is your cue to become a detective and fix the root cause, not just the symptom. I learned this the hard way with my first gecko, and it made all the difference for my others. Understanding gecko shedding problems helps you know what to fix. With that knowledge, you can prevent future sheds from going awry.
- Verify Humidity Levels: Is your humid hide adequately moist? For my leopard and fat-tailed geckos, I aim for 70-80% humidity inside the hide. A simple spray bottle check isn’t enough; use a digital hygrometer.
- Assess Overall Hydration: Is the water dish full and clean? Do you see your gecko drinking? Dehydration is a primary culprit behind bad sheds.
- Check for Rough Surfaces: Inspect the tank for any sharp or abrasive décor that could have snagged the shed and contributed to the problem.
Long-Term Health Monitoring (The Next Few Days)
Keep a close eye on your gecko over the next several days. Their behavior and appearance will tell you if they’ve fully recovered. If a hatchling is thriving, you’ll notice steady feeding, curious activity, and bright eyes. Healthy hatchlings also shed smoothly and stay well hydrated.
- Appetite Check: Offer their favorite food. A gecko that eats well is usually a happy, healthy gecko. If they refuse a meal or two, monitor closely.
- Monitor for Infection: Watch the previously affected area for any swelling, discoloration (like darkening or a yellowish hue), or pus. These are signs of a potential infection.
- Watch Their Walk: Pay special attention to their feet and toes. Any limping or favoring of a foot could indicate a smaller piece of retained shed you missed or a minor sprain from the handling.
The goal is to see your gecko bounce back completely, acting as if the whole stressful event never happened. If anything seems off during this monitoring period, do not hesitate to contact a qualified reptile veterinarian. It is always better to be safe and get professional advice for the animal you love. Be aware of signs that require urgent veterinary care. They can include sudden lethargy, refusal to eat, severe dehydration, or breathing difficulties.
FAQs
How can I tell if my gecko is stressed during the shed removal process?
Signs of stress include frantic attempts to escape, hissing, or tail dropping, and you should pause the process if these occur.
Are there any home remedies I should avoid when dealing with stuck shed?
Avoid using oils, lotions, or any substances not recommended by a vet, as they can harm your gecko’s skin or be toxic if ingested. To keep your gecko safe from household chemicals, store cleaners and solvents securely out of reach and away from the enclosure. Wipe up spills promptly and ensure the area around the terrarium is clean before introducing your pet.
What is the best way to handle a gecko that is resistant to being soaked?
If your gecko resists soaking, try using a smaller container with familiar objects and limit the session to shorter periods to reduce anxiety. By watching your gecko’s mood cues, you can interpret stress signals and tailor safer handling sessions.
Caring for Your Gecko’s Skin
When your gecko has stuck shed, always start with the gentlest methods first. A warm, humid hide is your best initial tool, followed by a shallow sauna session and careful manual removal only if necessary. Patience is your greatest asset, and rushing the process can cause more harm than the stuck shed itself. Keeping the enclosure at proper humidity makes shedding easier and less stressful for your gecko, so habitat humidity should be a regular care focus. A consistently balanced environment supports easy shedding and fewer future issues.
Ultimately, preventing stuck shed through excellent habitat management is the hallmark of a dedicated keeper. I’ve learned from my own crew that consistent care, a well-maintained tank, and a curious mind that’s always learning are what truly keep our scaly friends thriving for years to come.
Further Reading & Sources
- Crested Gecko Shedding and How To Help Your Gecko Shed! – Zen Habitats
- r/CrestedGecko on Reddit: Need help with stuck shed
- Common Shed Issues – How to Safely Offer Your Gecko …
The Gecko Guide is your ultimate resource for gecko enthusiasts, providing expert advice and practical tips to ensure the health and happiness of your scaly companions. Alexander is a passionate gecko owner with over a decade of experience in reptile care. We are dedicated to offering accurate, up-to-date information to support your gecko journey.Our mission is to foster a community of responsible gecko owners who are passionate about the well-being of these fascinating creatures.
Shedding & Skin Health